If you’ve ever noticed the box at the top of your Word document that says ‘Normal’ and thought, yep, good to know, nothing wrong here, then you’re misunderstanding a rather vital part of this remarkable (but sometimes annoying) tool called Microsoft Word.
Say you’re writing a long document. You have different sections, each with headings and subheadings. You want the headings to stand out. So you highlight the text and click the Bold button, then make the font 16 point, then maybe italicize it for good measure. Easy.
Chapter 1
In the next section you need to do it again. But you’re not sure if you used 16 point or 14 last time round, so you scroll up to check. Still easy.
But then you decide you need some subheadings and even some further subheadings.
Chapter 1
The parts of a chicken
The beak
Pretty soon you have rather a lot of remembering to do if you’re to make your document look nice and consistent all the way through. And, let’s face it, you’ll probably just give up and decide that no one will care if some headings are underlined and some aren’t.
Fair point.
But there is a really simple trick you should know about. On the face of it, its primary benefit is that you can structure your document to look nice and clean and consistent from start to finish, but it has a major secondary benefit too: being able to apply a table of contents with a couple of clicks.
Introducing ‘styles’.
To see how styles can make life easier for you, try this.
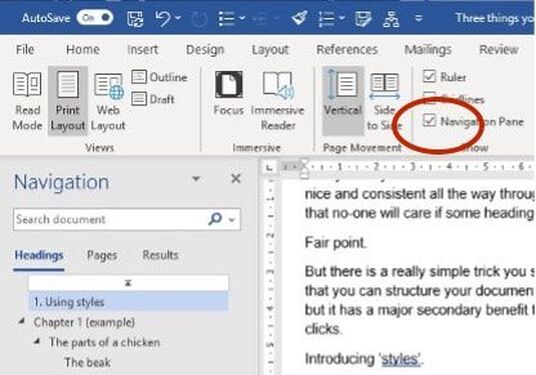
Open any old Word doc and click on the View tab, then check the Navigation Pane box. A panel will appear on the left-hand side. If you haven't used styles, the panel will be empty. In the example below, some of the headings have been assigned heading styles, and it looks like this ...
The entries in the side panel match the chapters in this document. In a really long document, the ability to visualise all of the sections inside a panel like this is invaluable, firstly because clicking on any one of them takes you right there without having to scroll. And secondly, you can use it to see how your document is shaping up and whether everything is in the right place at a glance. It gives you a bird’s-eye view of the whole document.
This is how to apply styles:
This is how to apply styles:
- Type your heading text and select it.
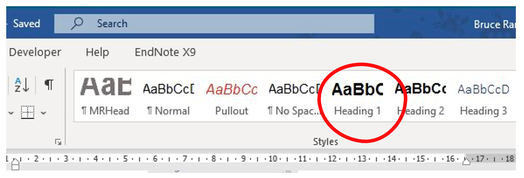
- From the Styles menu at the top of the doc, click Heading 1.
Your text will take on the format assigned to Heading 1. It might be blue, or a different font. But don’t worry about that for now.
Chapter 1
While it doesn’t appear to be very different to the way we first did it – by directly clicking bold – you’ve now told Word that this is a top-level heading. The same goes for the subsections inside Chapter 1. 'The parts of a chicken' is a direct subsection of Chapter 1, so clearly we would apply Heading 2 style to it (i.e. a second-level heading).
Highlight the text and hit Heading 2 from the Styles menu. It now looks like this.
The parts of a chicken
The same goes for 'The beak'. It's a part of a chicken, and so needs to be Heading 3.
The beak
Now look at your Navigation Pane. It delightfully displays your new headings in an ordered list.
By the way, the bulk of your text typically carries the style ‘Normal’. In most new documents in Word, Normal is Calibri 11 point. But you can change Normal, and Heading 1 and Heading 2 and Heading 3, to look any way you like (red, italic, Verdana …) and update the style to match. Magically, each instance of the style you’ve changed will update to look just how you tell it to. You can even build your own new styles.
But the foremost benefit of using styles, particularly in a long document, is that you can insert an automatic table of contents with just a few clicks.
If you’ve ever gone to the trouble of entering a table of contents manually, typing a row of dots like this:
Chapter 1 ............................................................ 3
only to find later that not only does chapter 1 no longer begin on page 3 but also the margins have changed and it now looks like this …
Chapter 1 ………………………………………………………………………………………………
……………….3
then you’ll appreciate the value of what you’re about to discover.
This is how to insert a table of contents:
- From the References tab, click on the Table of Contents icon (top-left).
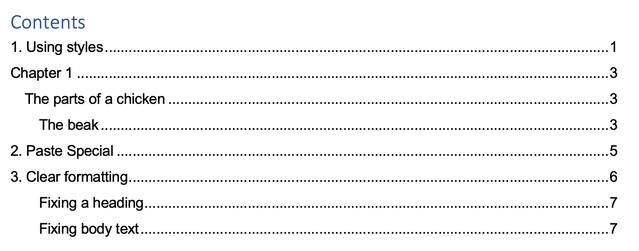
- There are a few options but try the first one: Automatic Table 1. This is the result (in the Word doc I used to write this post).
As your document develops the page numbers will change, of course. That’s easy fixed.
Voila! The table is now up to date. The only thing left to do is to remember to update the field as the last step before you print or PDF your document.
- Right-click anywhere inside the table text and from the window that pops up click Update Field.
- Select Update entire table and click OK.
Voila! The table is now up to date. The only thing left to do is to remember to update the field as the last step before you print or PDF your document.
2. Paste Special
If you’ve ever had trouble with the formatting of a Word doc going haywire, with text jumping around all over the place, or paragraph breaks not behaving, or … well, we’ve all been there. Trying to fix it can take as long as writing the document in the first place. The likely cause is that you’ve inadvertently dragged a whole bunch of unwanted formatting into the doc from an outside source. For example, each time you copy a passage of text from another doc, or a PDF, or a web page, with that text comes all the formatting belonging to it in its source location. It might look clean but in reality it’s like asking someone into your house who’s just stepped in dog shit.
It’s best to ask them to take off their shoes first.
In text from another source there can be quite complex invisible coding around it that, when you paste it into your nice clean document, gums it up with superfluous commands. This picture will give you an idea of how much ‘instruction’ can come with even a single word, if it’s not clean.
That’s a lot for Word to remember, if you think about the potential for each word or paragraph to carry similar formatting gunk. And each time you or someone from your team pastes in new unclean text, the problem only gets worse. It’s no wonder that not ‘wiping your feet’ with introduced text can cause problems.
By the way, when your text is clean, the above box reads simply
Normal.
So, next time you’re introducing new text into your nice clean document, do this.
By the way, when your text is clean, the above box reads simply
Normal.
So, next time you’re introducing new text into your nice clean document, do this.
- Select the text from your source and copy it as usual (Ctrl-C or right-click > copy).
- In your Word document, place your cursor where you want the new text.
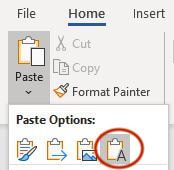
- Instead of hitting Ctrl-V like you usually would, click on the Paste icon (Home menu, top-left of screen) and select the Keep Text Only option (a clipboard with an A on it).
You can find the same command with a right-click.
Your new text will be stripped of its yucky baggage and will conform to the styles in your nice clean document. In fact it will adopt the style of the paragraph into which you’re inserting it; in most cases that will be Normal.
There are lots of other scenarios when it comes to wrangling source formatting vs destination formatting, but this is the most common one. Try it, and play with the others. You’ll soon get the hang of it.
3. Clear formatting
Chances are it’s too late – you’re working with someone else’s document, someone who didn’t put out the ‘wipe your feet’ mat and there’s virtual muddy footprints all over the document. Don’t worry, you can fix it – paragraph by paragraph if necessary – wiping away the mud and even applying your own styles to make the doc behave as it should.
Fixing a heading
Someone’s chapter heading looks like this:
Chapter 5
Highlight the text, then hit Heading 1 from the styles menu (or whichever heading level you want it to be).
Fixing body text
It’s often the case that the above procedure works for whole paragraphs too – simply select it and hit Normal – but sometimes it’s not completely successful and bits of icky leftover formatting remain. It’s actually best to add a simple step:
Highlight the whole paragraph (or more than one paragraph if you need), then from the Home tab, in the Font cluster, click the A with the purple eraser (Clear All Formatting). The text will still revert to Normal but a bit more thoroughly than were you to apply Normal from the styles menu.
Here endeth the lesson.


